
For a "normal" lens, focusing is not all that hard, but for a wide angle lens it is a bit tricky since the variation in focus is slow with a turn in the focus ring. So much is in focus, or nearly so, it is hard to tell what you are doing through the viewfinder. So let's change the game and simplify the process.
For the sorts of photography I'm interested in, the solution to handling this lens is to fix the focal distance and adjust the aperture. The plan goes as follows.
I have found this great application called OptimumCS-Pro that does an excellent job of combining the effect of the hyperlocal distance with diffraction. This means that the point of sharpest focus is degraded by diffraction as is the location of the nearest and farthest points that are in focus. This means that you get a realistic indication of the true depth of field from the software. If I dial in 14 mm focal length and set the focal distance to 10 ft, Here's the output from the program
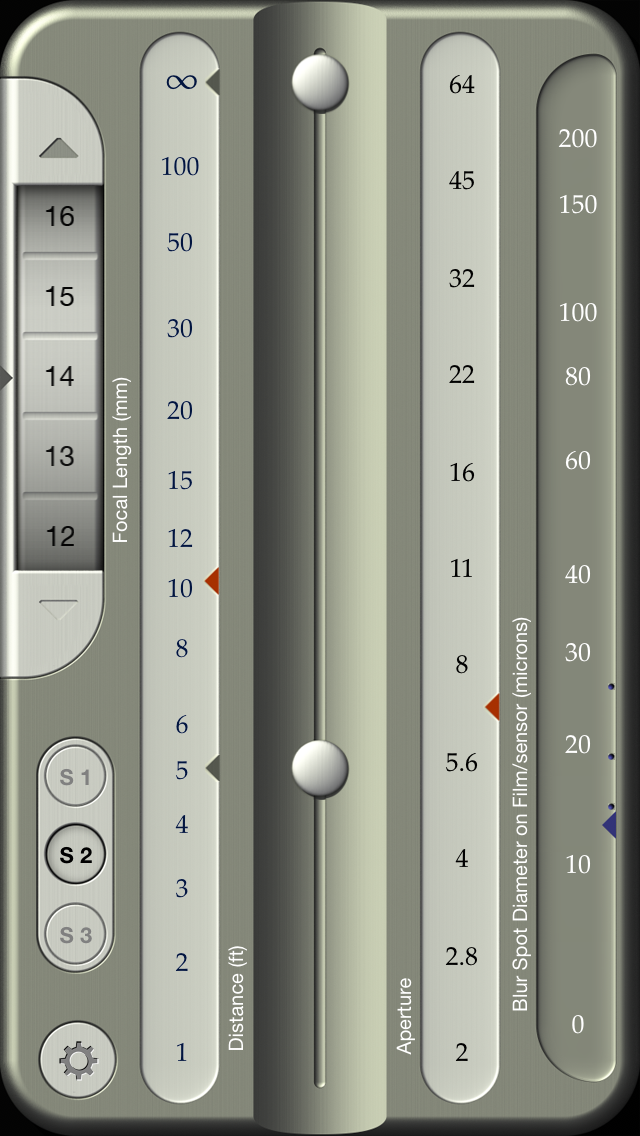 |
| Display of the screen of OptimumCS-Pro when the 10 ft. focal distance is set to 10 feet. |
This program gives a lot of useful information on this screen. The red arrow on the distance scale indicates the (approximately) 10 foot focal length. The two black arrows shows the near and far focal distances. Notice that when everything between 5 feet and infinity is focus, the f-stop is indicated by the black arrow on the aperture scale: roughly halfway between 5.6 and 8. At this aperture, the size of the blur spot is 12-13 microns indicated by the blue arrow on the blur spot size scale. The three dots above the blue blur spot arrow indicate the size of the blur spot for ±1, ±2, ±3 stops away from the ideal at the blue arrow. This shows the effect of moving away from that ideal aperture setting. Now, this lens has a maximum aperture of 2.8, which is about 2.5 stops away from the ideal. This means that for all f-stops from 2.8 to 8 the blur spot on the sensor is never larger than about 25 microns.
Now comparing this with a standard DOF table that does not take into account diffraction, I find that adjusting the f-stop from 2.8 to 8 changes only the near focus from 4.2 ft to 2 ft. the far focus is always infinity. this gives some confidence that for most reasonable print sizes, I'm going to get images that are well focused throughout the image. If I really want an image that I will enlarge a lot, I can close down and nail it for sure.
This is pretty amazing. This means that if I fix the focal distance at 10 feet, I can make variations in the aperture to adjust the near focus distance while keeping the far point at infinity. This is great for architecture. I can fix the focal distance and adjust the aperture to get what I need. For most purposes, I can simply adjust the aperture according to the illumination and not worry (much) about the depth of field. A short focal length manual-focus lens is really easy to shoot with.
According to Cambridge in Colour, the Airy disk (produced by diffraction) for apertures in the range of 2.8 and 8 are within one pixel on a D800E. All this again points to this being a viable solution.
When in a church, it is not always well-lit. Being able to go to f/2.8 is a real plus in getting the images of the interior I want. Being able to pick 5.6 or 8 to get a bit more depth of field and overall sharpness is good when possible. Point and shoot with a minimum of effort.
Good stuff all around. But does it really work? To find out, I have taped the focal distance down on the lens to fix it at 10 feet and made a series of test images to find out how all this theory works.

Above is a collection of shots taken on Beverly street that I have extracted from Capture One with the regions in focus highlighted in green. Since C1 uses a nice and clever algorithm for finding the parts in focus, this should give an unbiased indication of what is focus and what is not. If you scan through the images, you can see that as the aperture gets smaller, the area covered by the green highlight grows as expected. What is clear (if you have good eyesight) is that this chance in the how much of the foreground is in focus is all that really changes. In the distance, nothing really changes.
The only difference among the images is that wide open, at f/2.8, the image is a bit soft overall. But to see this, you need to magnify the image to 3X normal. At 100% it is difficult to tell the differences. By the time the aperture is closed to f/3.2 or f/3.5, you really can't tell the difference among the images at any magnification.
I'd say that the scheme has worked. Switching from manual focus to "auto" focus is not so hard after all. I can shoot at comfortable f/5.6 or so unless I'm forced to open up because there is not enough light. In the case I need to open up, I can still get an image, it just won't enlarge quite as much.
I can live with that.
This means that I can take on a city with my D800E and two lenses: the 50mm f/1.8 and the 14 mm f/2.8. This has the advantage that I get good low light capability (well, better than the Fuji and Nikon 1) and can really explore a city with minimal equipment.
No comments:
Post a Comment
We enjoy hearing from our readers.